Find

Tuesday, 14 April 2015

Baltimore

We are really getting very close to the end of our American adventure now with little over a week to go. With this in mind we have been trying to get back out there to see a little more of this vast land before our forthcoming departure. 

The only thing is the weather was mostly not on our side. On the first day of Spring we had a snowstorm and the average temperature was around 5° C. This lead us to sadly postpone and eventually cancel our Niagara Falls and Lakes district road trip.

The first time we postponed the trip we dropped in for a last minute visit to my sister's house in DC. On the way back home we stopped off at Baltimore in the late afternoon. We went straight to historic Fell's Point after reading some descriptions on Tripadvisor on the way there. I made Tim park about 5 or 6 blocks away in a panic that there wouldn't be parking closer. True, there were closer spots but where we parked was free and the other spots weren't so he didn't complain about it.


We arrived at a bit of an awkward hour, around 3 or 4 pm onto South Broadway. I was sad that the Broadway Markets were closed on Sundays and I hoped that there would be other things that were open. Walking on, we found the quirky little Cafe Latte'da which had some nice cappuccinos. 

With our coffee in hand we walked down the increasingly pretty street on towards the harbour. It has a very UK vibe to the place, which reminded me somewhat of St. Andrews in Scotland but with wider streets and a striking lack of Gothic architecture and highlands. 

I was already happy to have come to such a cute little place and that was before I found the boutique Poppy & Stella. Just as a little side story I got it into my head that I needed to buy certain wardrobe staples before I head back to Australia but I never seem to find the perfect white blouse. And voilà! I found one at this shop as well as a cute little bag. Oh happy days for me ☺

So after triumphantly strutting out of the shop with my coveted loot in hand, we just meandered around some more. It's honestly a nice place to just stroll, shop, eat and drink. We decided that we actually could do with another coffee, and lucky we did because the The Daily Grind was more than decent enough, it was quite enjoyable actually. Sitting outside was also a great place for people watching. Although about 50% had to have been dog watching as that was what the ratio was closer to. The inside of this café was also cute with a bit of an Italian alley / piazza vibe going on. 


After all the coffee we were a little peckish and decided to try the highly rated Tapas Adela for a some delicious Spanish fare. While on the pricey side of things this restaurant was lovely. We sat at the window with a great view of the water and the street. The Sangria was very nice and so were the tapas. All in all a great half day stop!


Monday, 23 March 2015

For the Love of Art!

Recently I blogged about sharing my new found love of watercolours with my husband in 'A Date with Paints'.

A lot of people commented to me that they loved the idea and would be sure to try it out. Myself I know I am guilty of pinning a million ideas to "try out one day" that never make it past my Pinterest Board. But I love to share a good go-getter attitude of someone who sees a good idea and then acts on it straight away.

So here is the beautiful art of my good friend Romie and her husband Khan who were inspired to try out their own Arty date. Isn't it just lovely?


Thursday, 19 March 2015

Pumpkin Walnut Bread


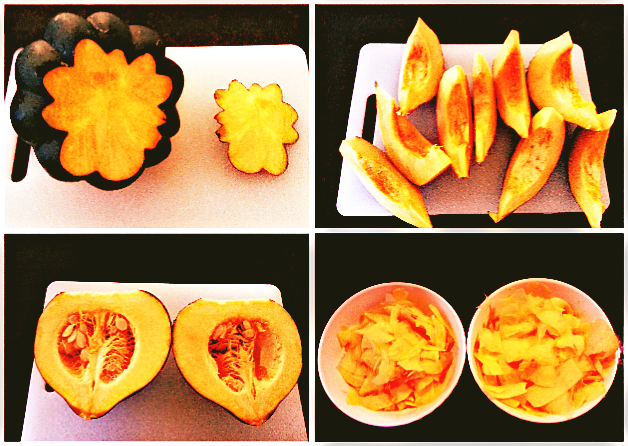
Here is a lovely pumpkin bread recipe that I have had a lot of success with. Personally I love to shred the pumpkin a potato peeler to get the long strips you do for cucumbers. This results gives an even distribution of whole pumpkin and results in a lovely moist bread. In this recipe I substitute eggs with chia-water, so instead of this you could use 3 whole eggs. But keep in mind that the chia seeds do add Omega-3, Fiber, Protein, Calcium, Zinc, Vitamin B3 (Niacin), Potassium, Vitamin B1 (Thiamine) and Vitamin B.


Likewise you could substitute the coconut oil for a different kind of oil. The benefits of using coconut oil however are many and include being a source of ketone which boosts brain function, is healthier for the heart, keeps you full for longer, and is a source of lauric acid which can kill pathogens.

Either way it is a very easy and yummy bread to make, enjoy!

Ingredients


1 small pumpkin (I used an acorn squash yielding approximately 3 cups)

3 tablespoons chia seeds

9 tablespoons water

2 cups wholemeal flour

2 teaspoons cinnamon

1 teaspoon baking soda

1/4 teaspoon baking powder

1/2 teaspoon salt

1/2 cup brown sugar

3/4 cup coconut oil

1/2 cup walnuts, chopped

1/4 cut whole walnuts (to top bread)


Method


1. Preheat oven to 160° Celsius or 325° Fahrenheit.

2. Grease a bread pan with coconut oil and set aside.


3.Wash, peel and de-seed the the pumpkin. Shred using a grater, potato peeler, or mandolin and set aside.


4. In a large cup combine the chia seeds and water and mix well, set aside.

5. In a bowl sift together the flour, cinnamon, baking soda, baking powder and salt. Mix well.


6. In another mixing bowl combine the sugar, chia-water mixture, coconut oil, and walnuts.


7. Combine both mixtures. Once thoroughly combined, gently fold in shredded pumpkin.


8. Pour batter into greased bread pan and top with whole walnuts.


9. Bake in the oven for approximately 1 hour or until a knife comes out clean when inserted into bread. Once ready cool for 15 minutes inside bread before removing.


Tuesday, 17 March 2015

Coconut Cheesecake Flan Recipe

The other week we were snowed in at my sister's house with four kids under three! It was complete insanity and took me about a week to recover from once we made it home. In the evenings, once we had finally put them to sleep we indulged in a little baking and made a different dessert every night.

Following the first snow - it got a lot worse that night.

On night one my sister suggested we make a variation of the classic Spanish dessert: Flan. This is a very popular Spanish dessert, so much so that as a kid I thought it was the only Spanish dessert. There are many variations but my personal preference is the traditional Flan de Huevo. That was until I tried this one!

My sister suggested we make the recipe 'Coconut Flan' from the book  Isabel's Cantina. We only slightly adapted it, namely we add coconut flakes for a little textural element. Because of its smooth creamy texture it is a actually more like when a flan meets a cheesecake who ate some coconut and they make a delicious baby and call it...


Coconut Cheesecake Flan


Ingredients

The ingredients

1 cup sugar

1/3 cup water

1 240 ml or 8 ounce packet of cream cheese, softened

1 400 ml or 14 ounce can coconut milk

1 400 ml or 14 ounce can sweetened condensed milk

1 cup unsweetened flaked coconut

6 eggs, lightly beaten

A pinch of salt


Recipe


1. Preheat the oven to 325° Fahrenheit or 165°Celsius. 

2. In a small heavy sauce pan, place sugar and slowly pour in water evenly.

3. Place the pan over medium heat and swirl to combine two ingredients. Continue swirling until visibly dissolved.   

4. A clear syrup will develop at this stage, cover the pot with lid and boil for 2 minutes. 

5. Once boiled uncover and gently until the liquid turns caramel coloured.

Making the caramel

6. Immediately and very carefully pour the hot liquid into 23 cm or 9 inch Bundt  pan and gently coat the sides of the pan with the caramel by slowly swirling the  liquid.

The caramel is very HOT, use caution when pouring.

7. In a large bowl combine the cream cheese and salt either by hand with a wooden spoon or with an electric mixer. 


8. Stir in the coconut milk and then the condensed milk to make a thick batter. 

9. Slowly add the eggs, combining gently until just mixed through and pour the cake into the pan.


10. Place in a bay-Marie of water reaching halfway up the pan in an oven tray large enough (as per photo below).

The water should reach half way up the Bundt pan
11. Bake in the oven for approximately 60 minutes or until just set. It should wobble slightly when shaken.

Allowing to cool to room temperature out of the fridge

12. Allow to cool to room temperature then chill in the fridge overnight or at least 4 hours.


Our head chef checking if it is ready the next day

13. Once cooled place the Bundt pan into a bowl with warm water for approximately 3 minutes to unstick the caramel from the bottom of the pan. After this time gently run a knife along the sides of the pan to loose it from the sides and turn it over onto the serving dish. 

It looks so good I feel like making it again!

Buen provecho!

Monday, 9 March 2015

A Date with Paints

Often it is easy to fall into routines that are not exactly good for us. I find this is also true when it comes to how we spend time with others. It is common to routinely go for drinks with friends, eat with family and watch TV with spouse/significant other. These are all things that I enjoy doing, but it doesn't mean that it should become the only way I interact with people. Also, these habits have exceedingly negative effects when indulged in too often. This is why I'm often on the lookout for new activities to try out both for me alone and to share with others. 

Painting and other creative endeavours have been shown to help in emotional and mental development and continued health. They are a positive way in which to relax and are make beautiful results, even if they are more abstract than realistic.


If you have been reading my blog you will remember that I recently took up water colour painting and am having a lot of fun with it. I decided that this would be a great activity to share with Tim. 

To make a day of it I gathered all the supplies needed and surprised him with it all laid out nicely and ready to use. These were water colour palettes, 2 glasses of water (one for rinsing brush, one for adding to paints), brushes in assorted sizes, paper towel, pencils, a sharpener, a rubber, a sharpie and art paper. Having it all prepared also meant "we are doing this now". It's like when you offer someone a cut piece of fruit rather than the whole thing, it's just more appetising / inviting. 

We decided to each draw two pictures in pencil for the other person to paint. Tim drew a fruit bowl and a Monkey Wizard for me and I drew him an owl and flowers. It's funny what the other one comes up with and it was a twist rather than just sitting down to paint. The monkey wizard was funny but I really enjoyed the geometric accuracy of Tim's fruit verses my usual 'rustic' style. It was also a way for me to mix things up with my painting. Tim also expressed that he would never draw and/or paint flowers himself but he really enjoyed the possibility of exploring techniques that the very simple daisy design affored him. Also he found my simple yet quirky little owl fun. Overall Tim very much enjoyed painting with me and said he would like to do it more regularly. 


After we finished our activity I got inspired to paint some more and I was very happy with my windmills from Consuegra. We were just there in September and took some great photos. I recreated it based on sight from the picture below.


Here is my version


I also sometimes do some googling for inspiration and here is one I did based on a Pinterest find (see link here).


Tuesday, 3 March 2015

Marinated Pork Tenderloin With Asian Greens


This was one of the best things I've ever cooked, or so Tim thought!
It's super easy to prepare, but bursting with delicious flavours. 
This recipe can be easily adapted based on your taste or what you have on hand! That is what I did myself actually. The original recipe that I drew my inspiration from can be found here. But I think mine turned out better ;-)


Marinated Pork Tenderloin


Ingredients


1 medium sized pork tenderloin

1 small bunch shallots, sliced (half for marinade, half for serving)

1 bunch fresh coriander, chopped (half for marinade, half for serving)

3 garlic cloves, minced

1 tablespoon fresh ginger, minced

1/3 cup soy sauce

1/4 cup coconut oil, warmed (or other oil as preferred)

2 tablespoons Zhenjian Black Chinese Vinegar

2 tablespoons chilli garlic sauce (or preferred spicy sauce)

1 tablespoon cracked black pepper

2 tablespoons brown sugar


Method


1. Trim excess fat from pork.

2. In large plastic ziploc bag mix all the other ingredients together, reserving half the shallots and corriander for serving. Mix well.

3. Place whole pork tenderloin in bag and seal. Let marinade in the fridge for 8 hours or overnight for best results (I have done it for as little as 2 hours). Turn occasionally so as to coat both sides. Do not worry if coconut oil clumps, it will melt in oven. 

4. Preheat oven to 180 degrees Celsius.

5. Once heated, place pork on a greased pan together will all the marinade and cook for approximately 35 minutes, so that it does not bleed when poked with a knife. 

6. Let rest outside of the oven for approximately 10 minutes.

7. Slice the pork into thin slices, served drizzled with the pan juices and topped with fresh chopped shallots and coriander. 


We serve it on a bed of rice with a side of delicious Asian Greens.

Quick Asian Greens


Ingredients 


1 bunch bok choy (or preferred Asian greens)

1 garlic clove, minced

1 tablespoon fresh ginger, minced

2 tablespoons soy sauce

1 tablespoon chilli garlic sauce

1 tablespoon coconut oil (or preferred oil)


Method


1. Wash and dry bok choy thoroughly, chop in half lengthways.

2. Heat oil in a large fry pan or wok. Sauté the garlic and ginger for 1 minute, or until fragrant. 

3. Add the bok choy, soy sauce and chilli garlic sauce to the pan. 

4. Mix thoroughly until combined and cook until vegetables are just wilted but still have some 'bite'.


Serve and enjoy!


Sunday, 1 March 2015

Leftovers Reinvented

The other week I had too many leftovers in my fridge. Leftovers generally get eaten within a day at my place so this does not usually happen. 

What I had leftover were two delicious but seemingly incongruous dishes: Jamón Pasta Carbonara and Baked Tofu Stir Fry. Having about a servings worth of each I incorporated some new ingredients to harmonize the flavours and made a lovely meal for that evening. This is also a good technique to jazz up some otherwise boring leftovers.


Stir Fried Pasta

Serves 2

Ingredients

1 serving leftover Jamón Pasta Carbonara
1 serving leftover Baked Tofu Stir Fry
2-3 small Dutch carrots, sliced
1 bunch Dutch carrot greens, chopped
1/2 green capsicum, diced
2 garlic cloves, finely diced
2-3 cup ZhenJiang black vinegar (or to taste)
1 teaspoon soy sauce (optional)
1 tablespoon chilli sauce (optional) 
100 grams sliced spicy salami, chopped (optional)
1 tablespoon oil


Method


In a large pan, heat oil over medium heat. 

Gently sauté capsicum, add garlic once softened.

Next add carrots and let soften slightly. 

The pasta dish should be added next and mixed through thoroughly so that it pan ingredients can be adequately incorporated.

Next add the vinegar and stir through. 

At this point add in the Baked Tofu Stir Fry (these ingredients are cooked so we only want to gently reheat and balance the flavour). Make sure that the heat is not too high.

Add a little soy and / or chilli sauce at this point if required. Stir through. 

When all the ingredients are sufficiently heated add the chopped salami and chopped carrot greens. Stir through and incorporate thoroughly.

Cook greens for approximately 1 minute or until just wilted. 


NOTE: This recipe would have been perfect if it had been done in a Wok, but alas I did not have one on hand! It really would have crisped up the pasta to make it even more yummy!


What do you think? Do you ever make a new dish from your leftovers? Let me know, I'd love to hear about it!